logo
  • Contact Us |
  • Login
  • Login
  • RVsitebuilder
  • RVskin
  • RVssl
  • Support
  • Partner
    • RVsitebuilder NOC Partner
    • RVskin NOC Partner
    • SSL Reseller Program
  • Products
    • cPanel
    • CloudLinux
    • Softaculous
    • RVskin
    • RVsitebuilder
    • RVssl
    • Virtualizor
  • Installation
  • Why Us?
order
  • Support
  • Submit Ticket
  • Verify License
Knowledge Base RVsitebuilder 5, 6 > Version 5 Creating Website

Custom Site Wide/ Side Addition (Top, Bottom, Left, Right)

by RV Support
2025-11-25 08:05:15

To add or edit your custom text/code in to addition positions in your webpage. You can do the following.

1. In case you use Normal Template in your project.

You can edit them in Step 2 -> Site Addition, and choose position you want to edit.

The setting here in Step 2 will take effect to every page in your website.

If you don’t see Site Addition in your Step 2, then you’re using Responsive Template. Please go to No.2.

*Everything you did in Step 2 , please don't forget to save by "Update Template" button at the top of step2.


2. In case you use Responsive Template in your project.

You can edit it in Step 3 -> WYSIWYG of each page -> Layout Template.

This setting will take effect by page, not the entire website.


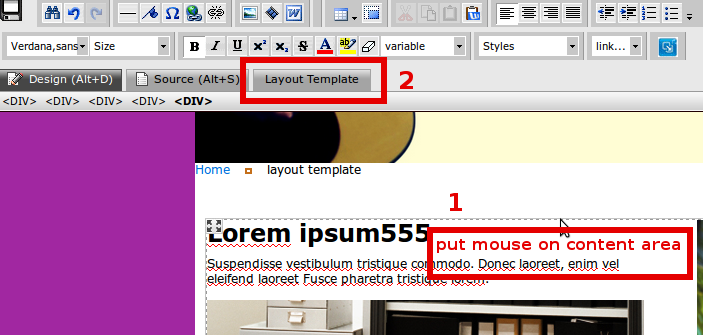
2.1 If your project was created with RVsitebuilder 5.2 , and got updated to RVsitebuilder 5.4. You will be with the Old WYSIWYG.

You need to put mouse on content area in order to open function "Layout Template" to edit.

        *This setting will take effect by page, not the entire website. If you want to have it every page, you’ll need to do in every page.


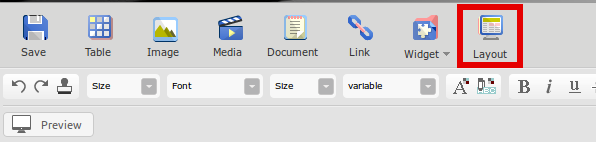
2.2 If your project is a fresh created in RVsitebuilder 5.4. You’ll get New WYSIWYG.

You can click on “Layout” feature in order to open Layout Template editor, and click the icon again to leave the Layout Template editor.

Then, the area to edit Top/Bottom/Left/Right will be appeared.

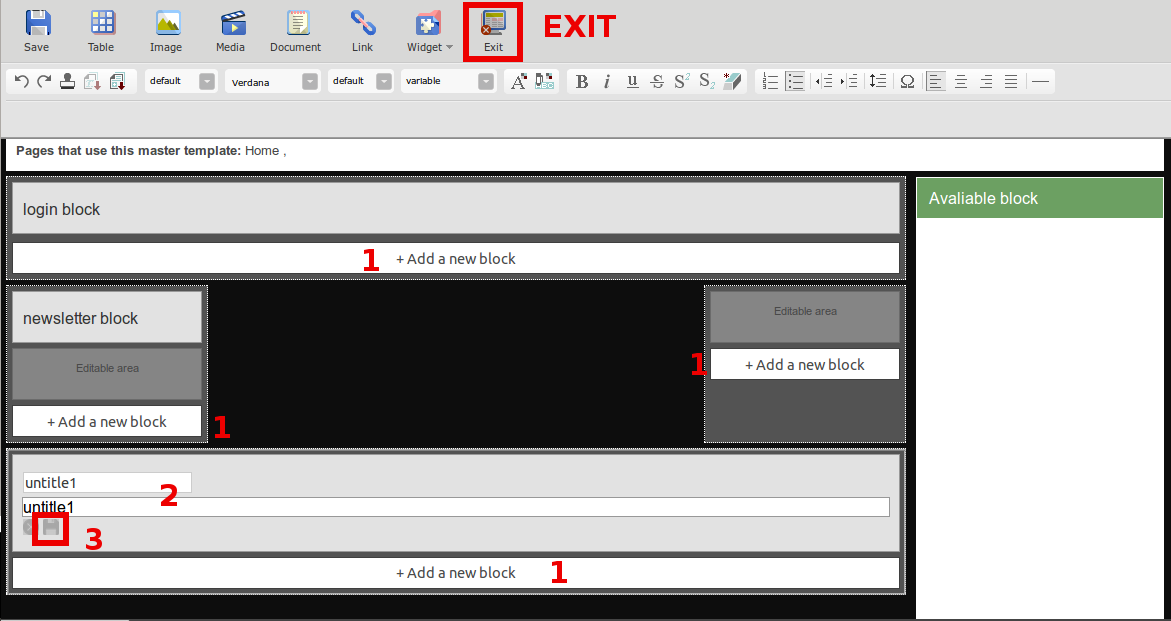
  1. Click “+ Add a new block” in the area you want to edit.
  2. Click “untitle1” to name and insert content to the destined area.
  3. Click “Save”.
  4. “Exit” from Site Wide editor.

        *This setting will take effect by page, not the entire website. If you want to have it every page, you’ll need to do in every page.

*Difference between responsive and normal template

Difference between responsive and normal template Previous Header SpaceNext

Articals in this section

  • RVSitebuilder 5.4 Release Notes
    Updated on 2025-11-18 08:05:28
  • Add Custom Font
    Updated on 2025-11-25 08:05:39
  • Add Google Maps with Widget feature in RVsitebuilder
    Updated on 2025-11-25 08:05:15
  • Add your image(s) for website banner
    Updated on 2025-11-25 08:05:15
  • Change Page Layout in WYSIWYG Editor
    Updated on 2025-11-18 09:17:55
  • Copy and Paste Content/Code from the external source
    Updated on 2025-11-25 08:05:15
  • Create a website with multi-language
    Updated on 2025-11-25 08:05:15
  • Setup Contact Form Sender for Online Form, Contact Us in website
    Updated on 2025-11-18 08:05:27
  • Set Website to display on Mobile
    Updated on 2025-11-25 08:05:15
  • Set background color/image for Body(content) area
    Updated on 2025-11-18 09:17:55
Privacy Policy   |   Terms of Service   |   Business SLA

rvsitebuilder

facebook twitter linkedin googleplus

COMPANY

Support
Contact
Login
Register
Why Us

SSL CERTIFICATES

Symantec
Thawte
Geotrust
RapidSSL

PRODUCTS

cPanel
CloudLinux
Virtualizor
Softaculous

LINKS

RVssl
RVskin
RVsitebuilder
Blog
RVskin Reseller
RVsitebuilder Reseller

Follow us

© 2020 - 2025 Netway Communication Co.,Ltd. All Rights Reserved.

Contact Us

  • Your address
  • admin@admin.com
RVsitebuilder | RVskin | RVssl | Support | Partner
2025 Company Inc. All rights reserved.   Powered by RVsitebuilder
  • RVsitebuilder
  • RVskin
  • RVssl
  • Support
  • Partner
    • RVsitebuilder NOC Partner
    • RVskin NOC Partner
    • SSL Reseller Program